Content:
- Intro
- 2. How to Unlock Wicked Thunder
- 3. Lore
- 4. Raid Guide
- 4.1. Raid Preparation
- 4.2. Phase One Main Mechanics
- 4.3. Phase One: Witch Hunt
- 4.4. Phase One: Electrope Edge
- 4.5. Phase One: Ion Cluster
- 4.6. Phase One: Electrope Transplant (Transition)
- 4.7. Phase Two: Introduction
- 4.8. Phase Two: Twilight and Midnight Sabbath
- 4.9. Phase Two: Chain Lightning
- 4.10. Phase Two: Sunrise Sabbath
- 5. Party Finder Strategies
- 6. Loot
- Final Thoughts
Intro
Welcome, fellow Warriors of Light! As a seasoned Final Fantasy XIV veteran with decades of raiding experience, I’m here to present a comprehensive guide to AAC Light-Heavyweight M4 (Savage) featuring the formidable boss Wicked Thunder. This guide includes essential strategies, lore, and mechanics—plus how to prepare, position, and mitigate the onslaught you’ll face. Throughout this guide, you’ll also see references to Onlyfarms and Onlyfarms.gg (where you can get all your Gil, Raids, Leveling, Extreme Trials, Glamour, PvP, Reputation, Gearing, Dungeons, and Mounts services taken care of). Let’s dive in!
Wicked Thunder is the fourth boss of the AAC Light-Heavyweight (Savage) raid series. This high-stakes encounter requires intense coordination, precision, and consistent DPS checks. Perfect for those seeking the ultimate challenge—and the ultimate rewards.

2. How to Unlock Wicked Thunder
| Raid Name | Unlock NPC | Location | Min. iLvl |
|---|---|---|---|
| AAC Light-Heavyweight M4 (Savage) | Gabbro | Solution Nine (x22.3, y17.1) | 710 (bypassable with full party) |
- Requirement: Complete the Normal difficulty of AAC Light-Heavyweight M4, then speak to Gabbro in Solution Nine
(x22.3, y17.1).
3. Lore
“Your match against the neoteric witch came to an abrupt end when the former heavyweight fighter decided to flee─but what if she hadn’t? Inspired by a muse of your own from Gabbro’s words, your thoughts drift back to that imaginary city of her creation once more, where you envision an altogether novel struggle taking place…”
4. Raid Guide
Overview
- Arena:
- Phase One: Floating platform with 16 squares (4×4) or sometimes 25 squares (5×5).
- Phase Two: 12 squares (3×4) after a forced knockback.
- Enrage Timer: ~13:30 into the fight, requiring ~141,145 raid DPS.
- Phase Structure:
- Phase One Mechanics
- Transition (Electrope Transplant)
- Phase Two Mechanics
4.1. Raid Preparation
- Party Composition: Split into two light parties with 1 Tank, 1 Healer, 2 DPS each.
- Waymarks: Not strictly necessary, but you can place them for orientation during the first phase.
4.2. Phase One Main Mechanics
Below is a quick-reference table of the common mechanics you’ll encounter in Phase One:
| Mechanic | Effect | Damage / Notes |
|---|---|---|
| Wrath of Zeus | Raidwide AoE | ~160,000 magic damage |
| Wicked Jolt | Tankbuster x2 + magic vuln debuff + magical auto-attack | ~460,000 magic damage per hit |
| Sidewise Spark | Half-arena cleave | One side of the arena is unsafe |
| Four Star | 4 players targeted with unmarked AoE stack (2 per stack) | ~260,000 magic damage split; magic vuln debuff |
| Eight Star | All 8 players receive unmarked AoE | ~130,000 magic damage; magic vuln debuff |
| Wicked Bolt | 5-hit stack AoE on a random healer | ~50,000 magic damage each hit |
Tip: If you’re behind on Leveling or Gearing, Onlyfarms can help optimize your character for savage content.
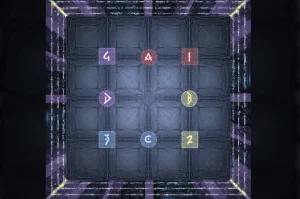
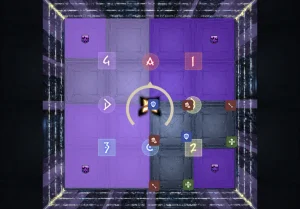
4.3. Phase One: Witch Hunt
4.3.1. Witch Hunt Mechanics
| Mechanic | Description |
|---|---|
| Bewitching Flight | Lasers from wings + line AoEs from arena cubes, leaving behind lightning lines that explode in sequence. |
| Witch Hunt | Targets either the 4 closest or 4 furthest players, dealing ~125,000 physical damage + physical vuln. |
| Electrifying Witch Hunt | Same as Witch Hunt but applies Forked Thunder (explodes around the player on expiry). |
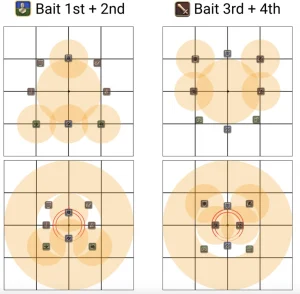
| Narrowing/Widening Witch Hunt | Alternates donut AoE and point-blank AoE four times, with close/far bait switching each set. |
4.3.2. Witch Hunt Strategy
-
Wrath of Zeus → Bewitching Flight:
- Mitigate Wrath of Zeus (~160k AoE).
- Boss jumps north and casts Bewitching Flight.
- Watch wing AoEs and cube AoEs to identify safe spots.
-
Electrifying Witch Hunt:
- Four players in the same role are targeted first.
- The opposite role is then targeted by either closest or furthest mechanic.
-
Narrowing/Widening Witch Hunt:
- Four sets of AoEs, alternating donut vs. point-blank.
- Use clock spots or pre-assigned positions.
- Tanks/Melee usually handle close baits; Ranged/Healers handle far baits.
4.4. Phase One: Electrope Edge
This section revolves around counting Witchgleam hits on Electromines (first) and on players (second).
4.4.1. Electrope Edge Mechanics
| Mechanic | Description |
|---|---|
| Electrope Edge 1 | Arena splits into 4×4; Electromines spawn at corners. |
| Witchgleam 1 | Hits all Electromines with line AoEs, increasing explosion size per hit. |
| Electrope Edge 2 | Arena splits into 5×5; all players get Electrical Condenser debuffs (long/short). |
| Witchgleam 2 | Hits players with line AoEs, raising explosion size when their debuffs expire. |
4.4.2. Electrope Edge Strategy
- Electromines + Witchgleam:
- Stand on cardinals to avoid line AoEs.
- Identify mines hit only once.
- Sidewise Spark + (Four Star / Eight Star):
- Dodge the half-arena cleave; stack or spread accordingly.
- Tanks handle Wicked Jolt (tankbuster).
- Second Electrope Edge:
- Everyone is hit by Witchgleam. Count your hits.
- AoEs cover the arena; keep track of long vs. short debuffs.
- Lightning Cage + Sidewise Spark + (Four/Eight Star) combos require careful positioning to avoid overlapping explosions.
- Wicked Bolt ends Phase One’s second major mechanic set. Stack and mitigate.
4.5. Phase One: Ion Cluster
Ion Cluster introduces opposing charges (Positron or Negatron) and complicated position-based mechanics.
4.5.1. Ion Cluster Mechanics
| Mechanic | Description |
|---|---|
| Ion Cluster | All players get 3 stacks of Positron or Negatron. They must be hit by the opposite charge to reduce stacks. |
| Stampeding Thunder | AoE covering three columns; breaks them if stepped in too many times. |
| Electron Stream | Boss channels negative (blue) or positive (orange). Closest player is hit for big damage; requires correct debuff. |
| Remote/Proximate Current | Conal AoEs targeting the furthest/closest player, used to cleanse Collider Conductor debuffs. |
| Spinning/Roundhouse Conductor | Small AoE vs. large donut AoE. |
4.5.2. Ion Cluster Strategy
- Ion Cluster + Stampeding Thunder:
- Identify which columns get hit and move quickly.
- Use Sprint if needed.
- Electron Stream:
- Split by color: Positron goes to Negative side, Negatron goes to Positive side.
- Tanks stand close for heavy hits.
- Remote/Proximate Current and Collider Conductor:
- One stands front, the other behind to properly intercept AoEs.
- Spread out if you have Spinning or Roundhouse Conductor AoEs.
- Repeat three times, each hit dealing massive damage. Healers, be ready!
4.6. Phase One: Electrope Transplant (Transition)
A breather phase requiring rotating conal AoE dodges, role-based soaking, and a final knockback.
4.6.1. Electrope Transplant Mechanics
| Mechanic | Description |
|---|---|
| Lightning Field | Rotating conal AoEs around the boss, changing safe spots each time. |
| Conduction Point | AoE on all four players of one role. |
| Forked Fissures | Wide line AoE on the role just hit by Conduction Point, must be blocked by the opposite role. |
| Soulshock | ~140,000 magic damage to all players. |
| Impact | ~40,000 physical damage. |
| Cannonbolt | ~150,000 magic damage + platform-wide knockback. |
4.6.2. Electrope Transplant Strategy
- Rotating Conal AoEs:
- Stay in relative positions with your light party. Move to each new safe spot.
- Conduction Point → Forked Fissures:
- One role is hit; the other role stands in front to soak. Continue rotating.
- Big Hits:
- Soulshock → two Impacts → Cannonbolt knocks you to the second platform.
Congratulations, you’ve reached Phase Two! If you’re aiming to refine your approach, consider a custom coaching session from Onlyfarms for personalized raid strategies.
4.7. Phase Two: Introduction
Wicked Thunder now becomes a wall boss, always facing south. The arena is a 3×4 grid, and positional requirements are removed.
4.7.1. Phase Two Intro Mechanics
| Mechanic | Description |
|---|---|
| Cross Tail Switch | A massive 9-hit raid buster (~120k each). Tank LB3 or heavy mitigation required. |
| Sabertail | Exaflare-like circle AoEs that move across the arena. |
| Wicked Blaze | 3 large AoE hits (~120k each) on both healers, shared damage. |
| Wicked Special | Boss visually signals line AoE in center columns (sword) or cleave outer columns (tails). |
| Mustard Bomb | Two tank tethers dealing ~460k each + 4 players targeted with AoE (~140k each). Debuff can be passed. |
| Aetherical Conversion | Both tails glow red (fire) or blue (ice). Used to determine subsequent Tail Thrust mechanic. |
| Tail Thrust | Tails slam in the order they glowed; red = big AoE, blue = knockback. |
4.8. Phase Two: Twilight and Midnight Sabbath
Twilight Sabbath and Midnight Sabbath revolve around reading clone positions for safe spots, plus additional AoEs and role-based stacks/spreads.
4.8.1. Twilight and Midnight Sabbath Mechanics
| Mechanic | Description |
|---|---|
| Azure Thunder | ~160k raidwide AoE that changes arena to a circular platform. |
| Twilight Sabbath | Four clones appear at cardinals in two pairs. Each set casts Sidewise Spark. |
| Wicked Fire | Large ground AoEs under all players. |
| Midnight Sabbath | Eight clones at cardinals/intercardinals. Winged clones = donut AoE; Cannon clones = line AoE. |
| Concentrated Burst / Scattered Burst | AoEs hitting roles in either a stack-then-spread or spread-then-stack sequence. |
| Wicked Thunder | ~120k raidwide magic damage. |
4.8.2. Twilight and Midnight Sabbath Strategy
- Azure Thunder:
- Mitigate heavy AoE.
- Arena becomes circular.
- Twilight Sabbath:
- Look for the first two clones (fastest spawn) to see which quadrant is safe.
- Wicked Fire spawns AoEs under everyone; move together to the safe quadrant.
- Second Pair of Twilight Clones:
- Move to the new safe quadrant; dodge Wicked Special (center line or outer columns).
- Midnight Sabbath:
- Up to four clones appear at once. Check if they’re winged or cannon:
- Winged = donut AoE.
- Cannon = line AoE.
- Concentrated or Scattered Burst:
- Concentrated: stack first, then spread.
- Scattered: spread first, then stack.
- Immediately after, dodge another Wicked Special + a Wicked Thunder raidwide.
4.9. Phase Two: Chain Lightning
A memory-based mechanic where you must recall the safe rods in correct order.
4.9.1. Chain Lightning Mechanics
- Aetherial Conversion again (remember it for later).
- Flame Slash: Splits the arena’s middle columns with a flaming sword.
- Raining Swords: Four towers appear on the outside columns. Safe rods remain after soaking.
- Chain Lightning: Each rod can be struck in a certain sequence. One rod on each side remains safe each time.
4.9.2. Chain Lightning Strategy
- Remember the Sequence: Assign a raid member to note which rod is safe each time.
- Move to Safe Rod: Step to the correct rod for each lightning strike.
- Tail Thrust: Boss reuses the pattern from Aetherial Conversion. Handle red/blue tail slams or knockbacks.
- Mustard Bomb repeats similarly to the earlier phase.
4.10. Phase Two: Sunrise Sabbath
The final series of mechanics tests your ability to handle Ion Cluster-style charges, clone cannons, tower soaks, and repeated combos.
4.10.1. Sunrise Sabbath Mechanics
| Mechanic | Description |
|---|---|
| Ion Cluster | Four players get Positron / Negatron (long debuff), four get short. |
| Sunrise Sabbath | Four intercardinal cannon clones + two cardinal clones. Color indicates positive or negative AoE lines. |
| Soaring Soulpress | The cardinal clones gaze at each other or diagonally, spawning 2-person towers that must be soaked. |
| Sword Quiver | Boss slashes the ground, forming line AoEs. Potential final slash to a row that must be dodged. |
| Laceration | Targets four players of one role with a conal stack AoE from the center (~250k split). |
4.10.2. Sunrise Sabbath Strategy
- Aetherical Conversion → Azure Thunder:
- Again, note color sequence for future Tail Thrust.
- Mitigate the ~160k raidwide.
- Ion Cluster:
- 2 short + 2 long debuffs per role.
- Short debuff = bait cannons first; Long debuff = soak towers first.
- Opposite in the second iteration.
- Clone Cannon Baiting:
- Bait the cannon away from the tower. Don’t stand too close to the clone’s spawn point.
- Wicked Special and Tail Thrust:
- Dodge in or out, then handle the final tail combo from the earlier Aetherical Conversion.
- Sword Quiver x3:
- Multiple ground slashes; watch the final horizontal slash each time.
- Laceration requires 2-player conal stack from center.
- Tanks/Melee often go row 1 (unless unsafe), Ranged/Healers go row 3 (unless unsafe). If your row is unsafe, move to row 2.
- Defeat Wicked Thunder before enrage (~13:30) to claim your rewards!
5. Party Finder Strategies
- Electrope Edge 2: Confirm how your group wants to handle the Four Star stack (times 2 + times 3 hits).
- Ion Cluster 1: Some groups use fully static “supports inside, DPS outside” or left/right assignments.
- Mustard Bomb: Decide if you want unaffected players to intercept tethers or if tanks pass the debuff.
- Midnight Sabbath: North group might rotate CCW vs. CW depending on data center preference.
- Sunrise Sabbath: Confirm your group’s cannon-baiting approach. Some stand near clones; others use waymarks.
6. Loot
Defeating Wicked Thunder rewards:
- Treasure Coffer:
- Contains Dark Horse Champion’s Weapon Coffer (iLvl 735) and a random Dark Horse Champion weapon.
- Additional Items (if no weekly clears in party):
- Monowheel S1 Identification Key (mount)
- Black Kitten (minion)
- A Risky Bet Orchestrion Roll
- Weekly Token:
- AAC Illustrated: LHW Edition IV (1 token per first clear of the week).
- 8 tokens = exchange for a Dark Horse Champion weapon of your choice at an Arcadion gear vendor.
Final Thoughts
AAC Light-Heavyweight M4 (Savage) – Wicked Thunder is a demanding, yet highly rewarding battle. Whether you’re a hardcore raider seeking the next challenge or a casual adventurer hoping to push endgame, the correct strategy, positioning, and timing are key.
Should you need any assistance—be it Gil, leveling, extreme trials, PvP boosts, or custom raid carries—look no further than Onlyfarms. Let us help you conquer every corner of Eorzea in style!
Good luck and happy raiding!