 ~20 MIN
Intro
Welcome to the ultimate Horrific Visions of Orgrimmar guide for World of Warcraft. This comprehensive walkthrough is designed to help players of all skill levels navigate the complex challenges of Orgrimmar’s Visions, defeat powerful bosses, and secure the best loot possible. Whether you’re a new player or a seasoned adventurer, understanding the mechanics and optimal routes is key to success.
💡 Onlyfarms offers premium boosting and coaching services, ensuring that players can confidently tackle Horrific Visions, unlock rare loot, and master intricate boss mechanics. With Onlyfarms at your side, even the most challenging content becomes manageable and rewarding.
In this enhanced guide, you’ll discover:
- Step-by-step navigation strategies for the treacherous corridors of Orgrimmar’s Horrific Visions.
- Tactics to overcome the most dangerous mobs and bosses.
- Optimal routes and zone-clearing strategies to maximize efficiency and minimize Sanity loss.
- Essential tips for managing Sanity, avoiding unnecessary mistakes, and optimizing your runs.
- Detailed insights on loot rewards, cosmetic bonuses, and how to prioritize objectives for the best results.
- Updated strategies and routes for both solo players and coordinated groups.
Whether you prefer exploring alone or with a team, this guide will equip you with the tools and knowledge to conquer the Horrific Visions of Orgrimmar and claim the riches that await.
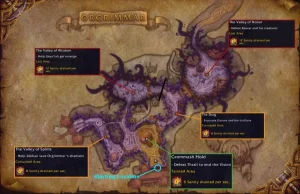

1. Starting Area: Valley of Strength
The Valley of Strength acts as the initial staging area in the Horrific Visions of Orgrimmar, offering a relatively low-risk environment where players can acclimate to the vision mechanics. Upon entering this zone, you’ll notice its familiar yet ominous design, with corrupted versions of Orgrimmar’s iconic architecture and eerie ambient effects setting the tone for the challenges ahead.
This area is more than just a warm-up: it’s your opportunity to establish a solid footing before tackling the tougher zones. Here’s what to focus on:
- Clearing minor mobs and hazards: You’ll face corrupted versions of Horde guards, low-level enemies, and scattered void creatures. These initial encounters are manageable and offer a good chance to practice mechanics. Use this time to hone your rotations, experiment with AoE abilities, and refine your Sanity management skills.
- Environmental dangers: Keep an eye out for traps and environmental hazards that can drain your Sanity if not avoided. This area is designed to teach players how to spot and circumvent such dangers, so stay vigilant and map out safe paths as you clear mobs.
- Rare mobs and hidden rewards: Don’t rush through the Valley! Take time to explore and look for rare enemies and hidden caches. Notably, you may encounter the Voidbound Ravager (Voidbound Ravager), a formidable rare that drops valuable loot and can grant a Sanity boost upon defeat. Similarly, the elusive Mail Muncher (Mail Muncher) can spawn here, offering a chance at cosmetic rewards and bonus loot.
- Group coordination and strategy setup: This area is perfect for regrouping with your team, finalizing role assignments, and setting clear objectives for the run. Solo players can use this time to plan their route, adjust talents, and ensure they have sufficient consumables prepared.
- Bonus activities: If your group is aiming for a perfect clear or higher challenge levels, consider revisiting any missed mobs or chests before progressing. Some players overlook the importance of fully clearing the Valley of Strength, missing out on extra resources and potential Sanity boosts.
💡 Pro Tip: Use this zone not just for warm-up but as a tactical setup area. Pop consumables, summon pets or totems, and synchronize cooldowns with your group if running in a team. The early mobs here are perfect for testing burst rotations, checking defensive cooldown readiness, and ensuring your group’s communication is solid.
2. Valley of Wisdom
The Valley of Wisdom is one of the pivotal zones within the Horrific Visions of Orgrimmar, marking a noticeable step up in difficulty compared to the Valley of Strength. This area combines challenging enemy packs, treacherous environmental hazards, and complex layouts designed to test both solo players and coordinated groups.
Key Challenges and Threats:
- Elite Enemy Packs: Expect to encounter numerous elite mobs, including Shadow Priests, Warlocks, and Void-touched creatures that utilize AoE spells, fears, and debuffs. These packs often include support mobs that heal or buff their allies, making target prioritization essential.
- Mini-Bosses and Randomized Encounters: Mid-zone mini-bosses may spawn with unique mechanics, such as Shadow Bolts, Fear Chains, or Corruption Puddles. These encounters are more challenging than standard packs and may require full group coordination to overcome.
- Environmental Hazards: Poison clouds, fire traps, unstable void zones, and exploding barrels are scattered throughout the Valley of Wisdom. These hazards not only reduce Sanity but can also cause chain-reaction pulls if mishandled. Plan your movement with care and use terrain to your advantage.
- Randomized Layouts: Each run may feature a slightly different layout, including hidden alcoves containing bonus chests or rare enemies. While exploring these side areas can yield additional rewards, doing so risks wasting Sanity and time.
Advanced Strategies:
- Methodical Clearing: Approach each pack systematically, using crowd control (CC), interrupts, and focus fire to prevent overwhelming damage. Assign roles within your group (tank, DPS, healer) and communicate frequently to handle unexpected threats.
- Sanity Management: Have a clear plan for when and where to use Orbs of Sanity, and consider designating safe spots along your route where you can recover Sanity if needed. Use defensive cooldowns and consumables preemptively to reduce Sanity loss in high-risk encounters.
- Mobility and Awareness: Avoid environmental hazards by staying aware of surroundings and utilizing movement abilities (blinks, rolls, teleports) to quickly reposition. Solo players should memorize hazard patterns and adjust routes on the fly.
- Bonus Objectives and Rare Spawns: Occasionally, bonus objectives such as elite rare mobs or hidden caches appear in the Valley. These can drop extra loot or provide Sanity boosts but may be heavily guarded. Evaluate your Sanity and resources before engaging.
💡 Pro Tip: Solo players should use pets or minions to scout ahead and trigger traps safely. In groups, designate a lead player to mark hazards and plan the safest path through randomized layouts. Using in-game markers or voice communication tools can significantly improve efficiency and reduce mistakes.
By thoroughly mastering the Valley of Wisdom, you’ll not only preserve Sanity but also secure additional loot and valuable resources, setting yourself up for a strong finish in the later zones of the Horrific Visions of Orgrimmar. Efficient clearing here is key to maintaining momentum and ensuring a successful, high-reward run.
3. Valley of Spirits
The Valley of Spirits is one of the most challenging and pivotal zones in the Horrific Visions of Orgrimmar, often serving as a litmus test for a player’s preparation, awareness, and adaptability. Known for its high-density mobs, complex environmental hazards, and hidden rewards, this zone pushes both solo adventurers and coordinated groups to their limits.
Main Challenges and Key Features:
- Dense Packs of Elite Enemies: The Valley is notorious for its tightly packed groups of void-corrupted mobs, including Shadowmancers, Void Hounds, and Elite Corruptors. These enemies feature high health pools, devastating AoE spells, and debilitating debuffs that can quickly overwhelm unprepared players.
- Mini-Boss Encounters: Certain runs may spawn mini-bosses with unique abilities, such as stacking void zones, fear chains, and damage shields. These encounters require focused interrupts, crowd control, and precise target prioritization to overcome.
- Environmental Hazards: The zone features a treacherous combination of Shadow Pools, flame traps, and void-infused corridors. Players must navigate narrow pathways, avoid sudden bursts of AoE damage, and remain constantly aware of surroundings to prevent accidental pulls or Sanity drain.
- Dynamic Layouts and Hidden Paths: Each run through the Valley of Spirits may present a unique configuration of corridors and open areas, with side paths leading to bonus chests, rare mobs, and hidden objectives. While exploring these areas can yield valuable rewards, it also increases exposure to hazards and Sanity risks.
Advanced Strategies:
- Tactical Pulls and Target Priority: Engage enemy packs one at a time, assigning interrupts to dangerous casters and focusing fire on priority targets. Use CC to manage support mobs and avoid being overwhelmed. In groups, designate a pull leader to control pacing and maintain team cohesion.
- Sanity Management: Allocate Orbs of Sanity strategically, ideally after high-risk encounters or when entering high-density areas. Solo players should memorize routes with minimal environmental hazards and identify spots for safe Sanity recovery. Groups can assign healers or support classes to assist with Sanity-restoring abilities and consumables.
- Efficient Exploration: While the Valley offers tempting side paths with potential bonuses, weigh the benefits against the cost of time and Sanity. Prioritize clear routes with minimal backtracking and avoid unnecessary engagements unless aiming for a perfect clear or specific achievements.
- Mobility and Awareness: Use movement abilities such as blinks, rolls, and teleports to bypass hazards or reposition during complex pulls. Be vigilant for hidden traps and learn their locations for future runs.
- Rare Mobs and Bonus Rewards: Keep an eye out for rare spawns, which may provide bonus loot, Sanity restoration, or temporary buffs. However, these encounters are often heavily guarded and should only be tackled if your group has the resources and Sanity to spare.
💡 Pro Tip: For groups, assign a dedicated scout to chart the safest path through the Valley, using markers or pings to highlight hazards, rare mobs, and loot opportunities. Solo players should consider using pets or minions to trigger traps and mitigate personal risk. Communication and adaptability are the keys to mastering this treacherous zone.
Mastering the Valley of Spirits not only paves the way for smoother progression through the Horrific Visions of Orgrimmar but also unlocks opportunities for bonus loot and increased Sanity sustainability. With careful planning, precise execution, and a clear understanding of enemy mechanics, players can turn this daunting zone into a significant advantage on their journey to victory.
4. The Drag
The Drag is one of the most complex and high-risk zones in the Horrific Visions of Orgrimmar, known for its labyrinthine layout, dense enemy packs, and deadly environmental hazards. This zone combines narrow corridors, strategically placed traps, and powerful elite mobs, testing players’ map awareness, combat skills, and Sanity management like never before.
Main Challenges and Features:
- Labyrinthine Layout and Chokepoints: The Drag is characterized by winding pathways with limited visibility, frequent dead ends, and tight choke points. Players can easily get disoriented, increasing the chance of accidental pulls or wasting precious Sanity retracing steps.
- High-Density Enemy Packs: Expect to face groups of Voidcallers, Shadowflame Acolytes, Corrupt Guards, and even minibosses stationed in tight corridors. These enemies often feature debilitating debuffs, AoE abilities, and powerful single-target attacks. Random patrols can complicate pulls, especially in solo runs.
- Environmental Hazards: Traps such as shadow-infused puddles, corruption-laden barrels, fire traps, and void bursts are scattered throughout the area. These hazards not only inflict direct damage but also rapidly deplete Sanity, creating a ticking clock effect. Some are hidden just around corners, requiring sharp awareness.
- Rare Spawns and Hidden Objectives: The Drag sometimes features rare mobs or hidden caches in side rooms or alcoves, offering valuable rewards like bonus loot, Sanity restoration, or temporary buffs. However, these encounters are risky, heavily guarded, and often demand extra preparation and group coordination.
Advanced Strategies:
- Controlled Pulls and Choke Management: In groups, assign a designated pull leader to pace the clear, using ranged abilities or pets to draw mobs into open spaces. Solo players should use terrain features for LoS pulls, reducing the number of active enemies. Avoid engaging multiple packs in narrow corridors.
- Trap Management and Mobility: Learn and memorize common trap layouts and environmental hazards. Use movement skills such as blinks, dashes, or teleports to bypass danger zones or reposition safely. Pets or minions can be used as scouts or to trigger traps, saving precious Sanity.
- Sanity Conservation Techniques: Plan Orb of Sanity usage strategically—ideally after major encounters, accidental pulls, or in safe zones where regrouping is possible. Assign healers or support roles in groups to coordinate Sanity-restoring abilities and consumables effectively.
- Exploration versus Efficiency: While bonus objectives, rare mobs, and hidden chests offer tempting rewards, weigh the risk against the potential loss of Sanity and time. If aiming for a clean, efficient clear, prioritize the main route and only explore side paths with low enemy density or obvious rewards.
- Communication and Role Assignment: In group runs, clear communication is essential. Use markers or voice chat to identify hazards, rare spawns, and safe zones. Assign dedicated scouts or hazard-clearers to manage risk and maintain momentum.
💡 Pro Tip: Solo players should prepare by memorizing map layouts from previous runs, identifying potential trap locations, and familiarizing themselves with enemy patrol patterns. Groups can use markers to highlight cleared paths, known hazards, and remaining objectives. Efficient use of voice communication tools can dramatically reduce errors and improve completion rates.
By mastering the intricate pathways, precise pull strategies, and hazard management in The Drag, players can ensure a smoother run, preserving Sanity, and setting themselves up for successful completion of the Horrific Visions of Orgrimmar. This challenging zone, when approached with caution and strategy, transforms from a chaotic maze into a manageable and rewarding part of your vision run.
5. Valley of Honor
The Valley of Honor represents one of the most crucial and perilous zones in the Horrific Visions of Orgrimmar, designed to challenge even the most prepared players. Its open yet intricate layout, high-density elite mobs, and hazardous environmental traps make this area a test of both skill and strategy. Whether playing solo or as part of a group, navigating the Valley of Honor effectively is essential for a successful and rewarding vision run.
Key Features and Escalating Challenges:
- Open-Concept Layout with Layered Danger: Unlike the narrow corridors of The Drag, the Valley of Honor offers an open battlefield where multiple enemy packs patrol and overlap. This openness provides tactical flexibility but also increases the risk of pulling several groups at once, especially when attempting to reposition.
- High-Density Elite Enemy Packs: The Valley teems with elite mobs such as Corrupt Warbringers, Void Summoners, and Shadowflame Acolytes, all of which bring devastating AoE abilities, debuffs, and crowd control mechanics to the fight. Dangerous attacks include Stampeding, where enemy groups charge in to overwhelm players, and Horrifying Shout, which disorients and fears players, scattering them and increasing the chance of pulling more mobs. These mechanics make precise coordination and crowd control critical.
- Powerful Buffs and Opportunities: As a counterbalance to the danger, players can obtain Gift of the Titans buffs in this area. This temporary boon significantly increases damage output, movement speed, and survivability, providing a much-needed advantage during tougher encounters or when clearing larger packs. Timing and positioning around Gift of the Titans pickups can turn the tide of a run.
- Complex Environmental Hazards: Expect strategically placed traps such as corruption puddles, fire bursts, shadow fissures, and explosive barrels. Many hazards are hidden near high-traffic pathways or enemy spawn points, punishing careless movement. Combined with the open layout, these traps can create layered hazards, requiring acute spatial awareness.
- Randomized Paths and Hidden Rewards: The layout of the Valley of Honor may shift between runs, revealing hidden side routes leading to bonus chests, rare mobs, or secret caches. While tempting, these paths often carry a heavy Sanity cost and can expose players to additional ambushes or environmental dangers.
Advanced Tactics for Mastery:
- Controlled Engagements with Clear Prioritization: In group settings, designate a pull leader who dictates pacing and target priority, focusing first on mobs that cast Horrifying Shout or execute Stampeding mechanics. Solo players should use pets, minions, or ranged attacks to pull enemies into cleared zones, minimizing accidental aggro from adjacent packs.
- Leveraging Gift of the Titans: Time your use of Gift of the Titans buffs strategically. These powerful buffs can be used to quickly clear dense enemy clusters or tackle particularly tough mini-bosses, turning potentially dangerous scenarios into manageable skirmishes. Communicate with your group to coordinate buff use and focus fire on priority targets.
- Sanity Management and Safe Zones: Identify areas where you can recover using Orbs of Sanity, especially after high-density encounters or risky bonus objectives. Groups should assign roles for Sanity support, while solo players should pre-map routes for maximum efficiency and minimal risk.
- Trap Mastery and Environmental Awareness: Memorize typical trap locations and employ mobility abilities such as blinks, dashes, or teleports to evade environmental hazards. Pets or minions can safely trigger traps ahead of the main group or solo player, preserving Sanity and preventing surprise damage.
- Efficient Pathing for Rewards: Consider the cost-benefit of side exploration. While bonus objectives and rare mobs offer extra loot, they often come with increased Sanity risk and time investment. Balance your run’s goals against these factors, and adjust your approach based on your group’s performance and Sanity levels.
- Communication and Role Assignment: Effective communication is vital. In groups, use voice chat or markers to call out hazards, plan pulls, and coordinate Gift of the Titans activation. Assign specific players to handle environmental traps or scout side paths, ensuring a smooth and controlled approach through this dangerous zone.
💡 Pro Tip: Solo players should practice precision movement and memorization of Valley of Honor layouts to minimize risk. Groups should plan around Gift of the Titans buffs for large-scale pulls and prepare interrupts and CC for enemies using Horrifying Shout and Stampeding mechanics.
By mastering the complex terrain, enemy mechanics, and Sanity management in the Valley of Honor, players can transform a potentially overwhelming challenge into a smooth, efficient clear. With smart planning, careful execution, and precise coordination, this zone can yield valuable loot, rare rewards, and a triumphant step towards completing the Horrific Visions of Orgrimmar.
6. Thrall (End Boss)
The ultimate confrontation in the Horrific Visions of Orgrimmar is a climactic battle against Thrall, once Warchief of the Horde, now twisted and corrupted by the malevolent influence of N’Zoth. This encounter is a true test of endurance, skill, and strategy, combining high-damage phases, complex mechanics, and the ever-present threat of Sanity depletion.
Key Mechanics and Escalating Challenges:
- Corrupted Abilities and Environmental Hazards: Thrall’s arsenal includes powerful attacks imbued with N’Zoth’s corruption. Expect a combination of devastating AoE spells, debuffs that reduce healing effectiveness, and mechanics that aggressively drain Sanity. His aggression escalates with each phase, introducing new dangers and pushing players to the brink.
- Main Abilities:
Chain Lightning: A potent attack that bounces between players, inflicting heavy damage. In group runs, spreading out minimizes bounces; solo players must use defensive cooldowns or mobility skills to reduce damage taken.
Ancestral Smash: Thrall strikes with immense force, knocking players back and creating shockwaves. Positioning is critical to avoid being flung into environmental hazards.
Spirit Link Totem: This totem distributes incoming damage across players. In groups, coordinate to destroy it swiftly; for solo players, it becomes a priority target to prevent overwhelming damage.
Earthbind Field: Slows player movement within its area, often coinciding with other abilities to trap players in danger zones. Anticipate its placement and plan mobility accordingly.
Horrifying Shout: Unleashes a fear effect, disorienting players and scattering groups. Preemptively assign interrupts or use Fear-breaking abilities to prevent chaos.
Stampeding: During critical phases, Thrall may unleash a Stampeding mechanic, where he summons spectral images of Horde warriors that charge through the battlefield in waves. These phantoms deal heavy damage and knockback, disrupting player positioning and increasing Sanity drain. Anticipating the direction of the Stampeding charge is crucial for survival.
- Phase Escalations: As Thrall’s health diminishes, he introduces new mechanics, such as spawning adds, increasing AoE frequency, and creating widespread corruption pools and shadow fissures that further deplete Sanity.
- Gift of the Titans Activation: During the fight, players may encounter opportunities to trigger Gift of the Titans, a powerful buff that significantly enhances damage output, survivability, and movement speed. Coordinating the use of this buff is crucial for countering Thrall’s escalating mechanics and overwhelming add waves. Solo players should time Gift of the Titans for critical moments, such as dealing with multiple adds or during his most dangerous phases.
Advanced Strategies for Success:
- Preparation and Sanity Management: Before engaging, ensure all cooldowns are reset, consumables used, and Sanity levels topped off. Groups should plan for coordinated Orb of Sanity usage, while solo players should map out safe recovery points within the arena.
- Target Prioritization and Interrupts: Assign roles for interrupting Horrifying Shout and neutralizing Spirit Link Totems. Focus fire on high-priority threats, especially during phases when adds are present. Stay alert to the timing and paths of Stampeding to avoid unnecessary knockbacks and Sanity loss.
- Positioning and Mobility: Maintain spacing to limit Chain Lightning bounces, and use terrain features to avoid knockbacks from Ancestral Smash. Be mindful of Earthbind Field placements, and prepare to reposition quickly using movement abilities. Plan paths to avoid the predictable charges of Stampeding.
- Sanity Conservation Techniques: Use Orbs of Sanity strategically after high-damage phases or when Sanity drops below safe thresholds. Groups should coordinate orb usage to prevent overlap and waste. Solo players can combine Gift of the Titans with orb use for maximum survival and damage.
- Burst Windows and DPS Coordination: Time high-damage cooldowns for moments when Thrall summons adds, casts Stampeding, or when environmental hazards peak. Gift of the Titans buffs should be synchronized with group DPS for devastating effect, rapidly phasing Thrall and minimizing Sanity loss. Solo players should save Gift of the Titans for Thrall’s most dangerous moments to maximize burst potential and clear adds efficiently.
💡 Pro Tip: Learn Thrall’s ability rotation through practice, enabling you to anticipate mechanics and pre-position effectively. Solo players should memorize safe zones, while groups can assign markers and use voice communication to maintain control of the fight. Anticipating Gift of the Titans spawn points and Stampeding paths can dramatically shift the balance in your favor.
Defeating Thrall in the Horrific Visions of Orgrimmar is a testament to preparation, coordination, and adaptability. By mastering his mechanics, managing Sanity with precision, and leveraging Gift of the Titans effectively while countering Stampeding, players can turn a potentially overwhelming encounter into a triumphant victory, unlocking rare loot and exclusive achievements.
7. Final Thoughts
The Horrific Visions of Orgrimmar represent one of the most challenging and rewarding experiences in World of Warcraft, combining intricate map layouts, deadly mechanics, and the constant pressure of Sanity management. From navigating the Valley of Strength to the perilous corridors of The Drag and the climactic battle against Thrall, each zone offers unique challenges and opportunities for growth.
This guide has provided step-by-step strategies to help you:
- Master enemy mechanics, including dangerous abilities like Stampeding, Horrifying Shout, and the critical use of Gift of the Titans to counteract escalating threats.
- Optimize routes through zones like the Valley of Wisdom, Valley of Spirits, and Valley of Honor, balancing risk and reward while preserving precious Sanity.
- Plan effective Sanity Orb usage, coordinate group strategies, and adapt quickly to dynamic environmental hazards and randomized layouts.
- Confront and defeat Thrall, the corrupted Warchief, with a combination of preparation, precision, and adaptability, securing valuable loot and exclusive rewards.
💡 Onlyfarms offers expert coaching and premium boosting services to help players conquer the most challenging content in World of Warcraft, including Horrific Visions. With Onlyfarms, you can skip the grind, maximize your rewards, and elevate your gameplay to new heights.
Whether you’re a solo player aiming to master the mechanics or part of a coordinated group seeking perfect clears and rare loot, understanding the nuances of each zone and boss encounter is essential. By applying the strategies detailed in this guide, you’ll not only improve your efficiency and performance but also transform the daunting Horrific Visions of Orgrimmar into a manageable and rewarding experience.
Prepare wisely, act strategically, and embrace the challenge—the rewards await those who dare to conquer the darkness.