 ~23 MIN
Intro
The Liberation of Undermine is the second raid in The War Within expansion and drops players into a high-tech, hazard-ridden battlefield deep inside goblin territory. This raid is a celebration of engineering mayhem — filled with deadly contraptions, explosive bosses, and a final showdown with the infamous Chrome King Gallywix himself.
Spanning 8 bosses, this raid features partially flexible progression, layered mechanics, and goblin-styled creativity taken to extremes. From biker gangs and conveyor belts to casino chaos and twin-headed enforcers — Undermine is as wild as it gets.
To help you survive and conquer, we’ve crafted a complete Liberation of Undermine raid guide — walking you through each boss strategy, key mechanics, damage phases, and recovery points.
And if your group needs a boost? Onlyfarms.gg offers professional Raid Carries, Boss Strategy Help, Weekly Clear Services, and Loot Farming to help your team overcome even the most stubborn goblin defenses — fast and safely.

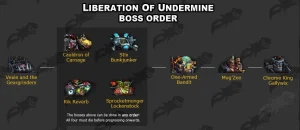
1. Bosses in Liberation of Undermine
| # | Boss Name | Notes |
|---|---|---|
| 1 | Vexie & the Geargrinders | Intro boss – chaotic bike phase & intermission burn |
| 2 | Stix Bunkjunker | Ball rolling mechanic + bomb coordination |
| 3 | Cauldron of Carnage | Split encounter: fire & lightning twin bosses |
| 4 | Rik Reverb | Sonic-themed fight with amplifier draining |
| 5 | Sprocketmonger Locknstock | Conveyor belt nightmare – movement test |
| 6 | The One-Armed Bandit | Casino-style encounter with token mechanics |
| 7 | Mug’Zee, Heads of Security | 2-headed enforcer fight with side-specific phases |
| 8 | Chrome King Gallywix | Final boss – multi-phase mech battle with giga-coils |
You must always begin with Vexie, and the final three bosses are fixed. The middle four (bosses 2–5) can be done in any order, giving your raid flexibility in routing.
2. Vexie and the Geargrinders Strategy Guide (Boss 1)
The raid begins with goblin madness on wheels — Vexie Fullthrottle charges in atop her monstrous deathbike, The Geargrinder, flanked by a biker gang and soaked in oil and fire. This fast-paced, chaotic encounter tests movement, coordination, and reaction time — with a wipe mechanic based on boss Energy levels.
Fight Overview
| Phase | Description | Key Mechanics |
|---|---|---|
| Phase 1 | Vehicle phase — remove Vexie’s armor | Motorbike control, oil & fire zones, biker adds |
| Phase 2 | Pit Stop — Vexie stunned | Repair goblins, burn window, fire patches |
| Phase 3 | Ground phase — final burn | Minimal new mechanics, lingering hazards |
Phase 1: Dismantling the Geargrinder
🛞 Biker Adds and Motorbikes:
- Bikers drive in straight lines. If they hit a wall — they’re stunned and dismount.
- Kill dismounted bikers, then mount their bikes and ride into Vexie to strip off Protective Plating.
- Each bike hit removes 1 stack — you must remove all stacks before 100 Energy.
🔥 Oil Slicks + Bomb Voyage!:
- Vexie drops Spew Oil puddles that make you slide (and on Heroic, stun bikers).
- Bomb Voyage! fire patches ignite oil — ignited slicks become deadly fire zones.
- Precise placement and movement are essential here.
🛡️ Tank Buster + Exhaust Fumes:
- Heavy-hitting frontal that applies a stacking debuff — swap every 1–2 stacks.
- On Heroic, this hit spawns a new Oil Slick under the tank.
- Each hit causes minor raid-wide damage (Exhaust Fumes), adding healer pressure.
🚨 Emergency Interrupt / Anti-Wipe:
- If Vexie reaches 100 Energy with plating intact, she casts a lethal AoE.
- This can be staggered if a biker crashes into her mid-cast — have a backup bike and rider ready at all times.
Phase 2: Pit Stop Burn Window
When Vexie’s plating is removed, she’s knocked off the Geargrinder, stunned for up to 45 seconds, and takes double damage.
Use this time to blow cooldowns, but beware of intermission mechanics:
| Mechanic | Notes |
|---|---|
| Repair Goblins | Try to fix the bike and shorten the stun — must be CC’d or killed ASAP |
| Burning Shrapnel | Random fire patches on the ground — avoid while burning |
| Backfire | Continuous raid-wide damage — healers should plan CDs for this moment |
📣 Use Heroism/Bloodlust here for maximum damage.
Phase 3: Burn Vexie to Ashes
Vexie now fights on foot — no new mechanics, but leftover hazards remain:
- Oil Slicks and fire pools don’t despawn — position carefully.
- If you had a clean Pit Stop, this phase is quick. If not, be ready for residual Bomb Voyage style effects.
- Tank Buster can still apply if she casted again — stay alert until she dies.
Role Priorities Summary
| Role | Priorities |
|---|---|
| Tanks | Swap on stacks, position away from fire, soak frontal |
| Healers | Manage Exhaust Fumes + Backfire, dispel fire debuffs |
| DPS | Clear bikers fast, handle bikes, blow cooldowns in Pit Stop |
| Everyone | Don’t slip in oil, don’t waste bikes, avoid fire chains |
3. Stix Bunkjunker Strategy Guide (Boss 2)
Stix Bunkjunker is a greedy demolitions expert, hiding behind junk piles and bombs while sending players rolling through garbage transformation mechanics. This fight has mobility-based phases, bomb control, and a high coordination ceiling.
Fight Overview
| Phase | Description | Key Mechanics |
|---|---|---|
| Phase 1 | Ball phase, garbage piles, bomb control | Rolling Rubbish, large bombs, Incinerator |
| Phase 2 | Add control + Overdrive | Territorial Bombshells, air phase, knockbacks |
Phase 1: Rolling Rubbish & Bombs
🟤 Rolling Rubbish Mechanic:
- 6 players are transformed into garbage balls.
- Roll over small trash piles to grow into medium and then large balls.
- Once fully charged, you can:
Crash into Stix for heavy damage
Or collide with a bomb to deactivate it
🧨 Bomb Management:
- Big bombs spawn regularly — must be neutralized by large balls.
- First bomb is usually for tanks, then DPS cycles.
- Missed bomb = raid wipe — assign roles early.
🔥 Incinerator Circles:
- Forces players to spread out — stepping into garbage piles ignites them.
- Ignited piles create stacking debuffs that stress healers and restrict movement.
- Dodge carefully and pre-assign movement lanes.
Phase 2: Overdrive Chaos
As Stix goes airborne, Territorial Bombshells spawn from junk piles.
| Mechanic | Strategy |
|---|---|
| Territorial Bombshells | Must be freed (HP to 75%), then killed in 30s — or they explode |
| Overdrive Air Phase | Stix is untargetable, unleashes Trash Compactor knockbacks and raid-wide AoE |
| After Overdrive | Stix gains attack speed and spawns bombs faster — fight gets harder |
📌 Mark safe zones for Overdrive knockbacks — get into corners or walls to avoid deaths.
Key Strategy Summary
| Role | Priorities |
|---|---|
| Tanks | Position boss center, handle early bomb soaks |
| Healers | Manage stacking debuffs + Overdrive raid damage |
| DPS | Burn adds fast, rotate Rolling Rubbish bombs |
| Everyone | Use trash piles wisely, soak bombs on time, dodge knockbacks |
4. Sprocketmonger Locknstock Strategy Guide (Boss 3)
Sprocketmonger Locknstock is where the raid truly begins to sweat. This boss is a relentless gauntlet of conveyor belts, explosives, rotating weapon systems, and environmental traps. The entire arena is a giant industrial hazard course, and survival hinges on spatial awareness, raid coordination, and split-second execution.
This mechanically demanding encounter requires mastery over belt positioning, mine management, and precise navigation across rotating threats.
Fight Structure Overview
| Phase | Description | Key Mechanics |
|---|---|---|
| Phase 1 | Mines, conveyor belt avoidance | Staggered detonations, tank bombs |
| Phase 2 | Electrified movement challenge | Debuff zones, positional stress |
| Phase 3 | Weapon escalation | Lasers, rockets, magnet pulls |
| Phase 4 | Chaos overlap | Full hazard rotation |
| Final Phase | Upgraded conveyor + knockbacks | Survival & execution check |
Phase 1: Bombs and Belts
⚠️ Foot Blaster Mines
- Four mines spawn — each must be detonated one at a time.
- Players are divided into 4 groups to soak/trigger mines in rotation.
- Failure to coordinate = raid-wide explosion or stacked debuffs.
🛠️ Tank Bomb Mechanic
- Active tank gets slow debuff + placed bomb.
- Must run away and drop the bomb far from the group.
- Swap tanks after detonation — poorly timed bombs will wipe the raid during mine phases.
🚷 Conveyor Belt Awareness
- Central belts are death zones: full of traps, knockbacks, and holes.
- Use side belts as movement paths — pre-assign safe lanes.
- Falling off the belt = death. No recovery. No second chance.
🧭 Positioning Tips
- Stack ranged near side belts for mobility.
- Melee need to “anchor” each lane for interrupt coverage and mine spacing.
Phase 2: Electricity + Debuff Zones
This phase is a high-stress mobility test.
⚡ Belt Electrification:
- Central belts light up with electricity. Standing too long = stacking DoT + debuff that reduces healing received.
🌀 Hazard Swirls:
- Lightning pools, debuff zones, and dazes cover the movement paths — forcing constant repositioning.
- Use movement speed buffs, warlock gates, and healer externals for recovery.
📣 This is a recovery phase — but any mistake here bleeds cooldowns for the next escalation.
Phase 3: Weapon Escalation
Now Sprocketmonger brings out the big guns.
🔫 Beam Sweep Lasers:
- Rotating lasers deal lethal damage. Early phases = narrow, late phases = arena-wide sweeps.
- Mark safe corners ahead of time; don’t stack near active beams.
🎯 Rocket Barrage:
- Random AoEs from above. In later stages, rocket density increases, reducing safe zones.
- Range players must spread out — overlapping zones are fatal.
🧲 Magnetic Pull:
- Drags players toward central belts, traps, or electrified zones.
- Use movement immunities (Tiger’s Lust, Disengage, Blink) to break away.
Phase 4: Full Hazard Overlap
This is the hardest execution checkpoint of the encounter.
| Overlapping Mechanic | Priority |
|---|---|
| Mines + Beams | Time mine soaks between laser sweeps |
| Rockets + Belts | Stay on safe outer lanes to dodge both |
| Pulls + Bombs | Tank bombs during magnetic pull = death combo |
☠️ Cooldown Usage:
- Rotate raid-wide defensives (Barrier, Devo Aura, Rallying Cry).
- Use healing externals for mine soakers and magnetic victims.
💣 Survival is more important than damage here. Assign backup soakers, assign burst healers to mine groups, and plan your CDs like a Mythic+ dungeon boss.
Final Phase: Conveyor Knockback and Rocketstorm
Sprocketmonger launches a final desperate attack: the conveyor belts knock players back while electrified, and the arena floods with hazards.
🟦 Stay on edge lanes — belts still push, and middle is still death.
🟦 Ticking AoEs increase — maintain spread while hugging safe zones.
🟦 Larger lasers + faster rockets = minimal room for error.
🟦 Tank bombs must be pre-positioned to prevent explosions mid-air.
This is the final push — damage GCDs are scarce. Use battle rezzes wisely and prioritize staying alive over DPS padding.
Role Summary Table
| Role | Tasks |
|---|---|
| Tanks | Soak bomb mechanics, rotate taunts, guide positioning |
| Healers | Time CDs for mines + magnetic pulls, top off electrified DoT |
| DPS | Avoid padding, handle mine groups, stay mobile |
| Everyone | Never step on central belts unless planned; spread for lasers and rockets |
5. Cauldron of Carnage Strategy Guide (Boss 4)
The Cauldron of Carnage is a dual-boss encounter featuring Flarendo, a fiery elemental in a flame tank, and Torq, a thundering lightning gorilla. These two titans of destruction must be kept separated throughout the fight — bringing them too close empowers them and drastically reduces incoming damage.
This is a split raid battle, where two balanced groups must handle different mechanics simultaneously. After reaching 50% health or time-based triggers, the bosses collide and swap arenas, forcing both teams to quickly adapt to the opposite mechanics.
Fight Overview
| Phase | Description | Key Mechanics |
|---|---|---|
| Phase 1 | Dual-boss split, each group fights one boss | Fire vs Lightning — two mechanics sets |
| Intermission | Bosses charge and swap | Explosion + arena reset |
| Phase 2 | Groups switch bosses | Must master opposite boss mechanics |
| Enrage | Soft enrage if one boss dies too slowly | Balance DPS to avoid wiping |
Flarendo’s Arena – Fire and Bomb Chaos
Blistering Spite (Raid-Wide Debuff)
- Fire-based DoT stacking the longer you remain in Flarendo’s arena.
- Acts as a soft enrage — healers must plan throughput cooldowns.
- Debuff resets during intermission.
Eruption Stomp (Tank Mechanic)
- Slams the ground and sends shockwaves from tank’s position.
- Tanks must sidestep immediately, stay within range, and reposition.
Bomb & Beam Combo
🔥 Flarendo’s signature move, requiring precise group coordination:
| Step | Mechanic | Action |
|---|---|---|
| 1 | Scrapbomb Spawns | Large red circle — entire group must soak |
| 2 | Blastburn Roarcannon | Tracks random player (usually ranged) with beam |
| 3 | Explosion | Soak the bomb, reposition after knockback |
| 4 | Aftermath | Fire waves + molten pools spawn under players |
🧠 Soaking Tips:
- Ranged should stay slightly close to avoid missing the soak.
- One player pulls the beam away just before soak, then rejoins quickly.
Torq’s Arena – Lightning & Movement Control
Galvanized Spite (DoT Aura)
- Lightning-based stacking DoT.
- Just like Flarendo’s Blistering Spite — reset mid-fight.
Static Charge (Movement Punishment)
- Moving too much charges energy.
- At 100%: 6-second stun and electric burst.
- Minimal movement is essential — reposition sparingly and carefully.
Thunderdrum Salvo
- Drops pools of lightning under players over 6 seconds.
- Stack pools together by briefly standing still, then move away as a group.
Lightning Bash (Tank Mechanic)
- Sudden burst of nature and physical damage.
- Use defensives, especially during Static Charge stacking.
⚡ Heroic Only – Voltaic Images:
- Lightning clones fixate players for 12 seconds.
- Kited carefully — avoid overlapping with others to prevent chain explosions.
Intermission: Explosive Collision
Once both bosses reach 50% (or a timed threshold), they charge toward the center and collide:
| Effect | Description |
|---|---|
| Massive Explosion | Raid-wide shockwave, avoid standing center |
| Fire + Lightning Pools | Hazardous zones spawn at impact site |
| Debuff Reset | Blistering and Galvanized Spite reset to 0 |
| Arena Swap | Fire team now faces Torq, Lightning team takes on Flarendo |
This is a moment to regroup, rotate cooldowns, and reposition — the second half is often more intense due to ability overlap.
Phase 2 – Reverse Roles
Now, each group handles the other boss’s mechanics. Success hinges on how well they observed during Phase 1.
| Team | New Mechanics |
|---|---|
| Fire Group → Lightning | Must now minimize movement, manage Thunderdrum and Bash |
| Lightning Group → Fire | Must coordinate soaks, beam lures, and molten pools |
💡 Pro tip: Assign raid leaders or vocal callers for each side to remind teams of priorities during the boss swap.
Enrage and Final Push
💣 DPS Balance Required:
If one boss drops significantly faster than the other, that side gets overwhelmed — and bosses can even enrage if kept alive too long.
📊 Track boss HPs closely and reassign DPS if needed.
🎯 Burn Priority:
Push both bosses below 10% at the same time and execute your final cooldowns together.
Role Summary
| Role | Focus |
|---|---|
| Tanks | Dance around cone mechanics (fire), manage Bash hits (lightning) |
| Healers | High HPS during stacking debuffs, especially after swaps |
| DPS | Learn both mechanics sets, handle soaks, kites, and pool placement |
| Everyone | Don’t over-move, soak as a group, balance both boss HPs tightly |
6. Rik Reverb Strategy Guide (Boss 5)
Get ready to drop the bass — literally. Rik Reverb is a flashy goblin DJ who brings chaotic energy to the raid with his arena-sized sound system, sonic shockwaves, and dangerously unstable Amplifiers. This fight combines positional control, interrupt management, and timed group launches in one of the most visually intense encounters of the Liberation of Undermine.
Fight Overview
| Phase | Description | Key Mechanics |
|---|---|---|
| Phase 1 | Active boss phase | Amplifier draining, Tinnitus debuff, Sonic Blasts |
| Intermission | Blaring Drop | Soundwave covers arena, must ride explosion to survive |
| Phase 2 | Encore | Repeat of Phase 1, with higher intensity and less safety |
Phase 1: Jam Session & Amplifier Drain
🎛️ Amplifiers — Core Mechanic
- Rik spawns pairs of Amplifiers near himself and a random ranged player.
- These charge up and must be drained before they reach 100 Energy — or they go Haywire and deal massive damage.
🛠️ Draining Process
- Right-click the Amplifier to begin draining (channeled, cannot move or act).
- Only one player can drain at a time — assign 2–3 per Amp to rotate duties.
- Noise Pollution aura stacks with each active Amplifier — pressure grows fast.
💣 Haywire Penalty
- Un-drained Amplifiers going Haywire cause:
Massive raid-wide burst
Spawn flying Resonant Echoes (AoE discs)
More Echoes = more chaos
🔊 Sonic Blast + Tinnitus (Frontal)
- Rik’s frontal cone must face away from the raid.
- Applies Tinnitus — stacking debuff increasing damage taken.
- Tank swap at ~5 stacks to allow debuff to drop.
🌀 Zap Splashes + Echoes
- Random AoEs + bouncing projectiles — require continuous movement awareness.
- Avoid clumping near Amplifiers to reduce splash damage overlap.
📍 Positioning Tips
- Melee stay behind Rik, avoid cones.
- Ranged loosely spread around Amplifiers.
- Never drop bombs or AoEs near draining players.
Intermission: Crank It to 11!
🎧 When Rik yells “Crank it to 11!”, the Blaring Drop begins.
🌊 Arena-Wide Soundwave
- A massive shockwave expands from the center — you cannot outrun it.
- Survival depends on triggering a controlled Amplifier explosion that launches the raid over the wave.
💥 Haywire Amplifier Ride
- One Amplifier is marked to go Haywire (glowing indicator).
- Entire raid must stack on it — when it detonates, it launches everyone into the air, safely riding over the soundwave.
🚫 Failure to stack = near-instant death
- Position properly, stop casting, don’t jump early — just stand still and ride it.
🎯 Pro Tip: Assign a raid leader to call the jump timing and reinforce positioning.
Phase 2: Encore – Amplified Mayhem
This phase mimics Phase 1, but with less recovery room, fewer safe zones, and faster amplifier cycling.
🎚️ New Amplifier spawns start faster.
💥 Residual Haywire Echoes from Phase 1 may linger — increasing environmental pressure.
⚠️ Overlapping debuffs from earlier Amplifiers + Soundwaves can create unavoidable overlaps if not drained fast enough.
📦 Drain rotations must be tighter. Reassign if players die during the Blaring Drop — backups are essential.
🧨 DPS Burn Priority:
Push Rik to 0% before another Blaring Drop phase occurs — the second intermission is often lethal if you’re out of launch Amplifiers.
Role Priorities Summary
| Role | Key Tasks |
|---|---|
| Tanks | Face Rik away, swap at 5 stacks of Tinnitus |
| Healers | Manage Noise Pollution + Zap damage, prep for Drop recovery |
| DPS | Handle Amplifier draining rotations, avoid splash overlap |
| Everyone | Know where the launch Amplifier is — stack when Drop hits |
7. The One-Armed Bandit Strategy Guide (Boss 6)
The One-Armed Bandit delivers a chaotic, casino-themed encounter full of deadly randomness, slot machine add spawns, and token-based mechanics that dictate raid-wide effects. To succeed, you’ll need strong pattern recognition, tight add control, and an understanding of how to “gamble” with tokens — or your team may hit the jackpot… and wipe.
Fight Overview
| Phase | Description | Key Mechanics |
|---|---|---|
| Phase 1 | Add management, token combos, casino chips | Spawned assistants, token slot effects |
| Phase 2 | Random mechanic combos, heavy raid damage | Beam coils, bomb adds, DPS race to kill before wipe |
Phase 1: Slot Machine Mayhem
🎰 Casino Token System
The core mechanic revolves around killing 3 types of adds, each dropping a unique token:
| Add Type | Token |
|---|---|
| Coin Assistant | 🟡 Coin Token |
| Shock Assistant | ⚡ Shock Token |
| Flame Assistant | 🔥 Flame Token |
🧠 After collecting 2 tokens, players can deposit them into the boss using an extra action button. The combination of tokens triggers specific mechanics.
❌ Repeating a combo (e.g., Coin + Coin) causes an instant wipe — every combination must be unique until all 6 have been used.
🔧 Ability Table – The One-Armed Bandit
| Ability | Description | Strategy |
|---|---|---|
| Casino Tokens | Rolls blue casino chips that travel across the arena. Players hit are stunned for 8 seconds, but those who narrowly avoid them receive a haste buff. | Players can choose to destroy chips to avoid risk or position themselves to safely collect the buff. Avoid clumping to reduce collateral stuns. |
| Slot Machine Adds | Spawns three assistants (Coin, Shock, Flame) at full energy. Each drops a unique token on death. | Assign DPS to nuke adds on spawn. Designate pickup order and ensure tokens are gathered promptly for phase progression. |
| Token Combinations | Two tokens are deposited into the boss to trigger raid-wide effects. Each combo must be unique — repeated combos cause a wipe. | Use a Token Tracker to record combos used. Assign roles for collection and clearly call out pairings to prevent accidental repeats. |
| Shocking Fields | When the tank is hit, it leaves an electric field that persists. These zones deal ticking damage and reduce movement space. | Tanks must rotate boss position frequently to drop fields in planned zones. Avoid cluttering key movement paths with overlapping fields. |
| Beam Coil Mechanic | Coils spawn and form beams that link to the boss. Any player caught in the beam suffers lethal damage. | Coil and beam orientation must be tracked. Designated beam targets move early to avoid lethal zones; tanks reposition the boss carefully. |
| Fixating Bomb Adds | Adds from certain token combos fixate on a player. If they reach their target, they explode, causing AoE damage. | Assign burst cleave DPS to focus these adds. Fixated players kite smartly and avoid dragging adds through the group. |
| Scattered Payout (Phase 2) | Raid-wide AoE pulses that grow stronger over time. Overlaps with other mechanics during soft enrage. | Time healing cooldowns accordingly. Focus damage to end the fight before AoEs and field saturation make the arena unplayable. |
🎯 Players must manage each mechanic actively while tracking combo usage, maintaining positioning, and avoiding chip-related disasters.
Phase 2: Chaos Finale
Once all 6 unique token combos are used, the boss goes into a random mechanic shuffle while unleashing heavy raid-wide damage.
| Mechanic | Description |
|---|---|
| Beam Coils | Deadly beams link coils to boss — avoid lines at all cost |
| Fixating Adds | Bomb adds chase players — explode if contact is made |
| Scattered Payout | Persistent AoE + stacking damage to the raid |
| Chips + Fields | Casino chips + leftover electric fields reduce safe space |
🧨 Soft Enrage:
As the fight continues, mechanics overlap unpredictably, and raid-wide damage increases sharply. The goal is to burn down the boss before he overwhelms the field with random chaos.
Role Responsibilities
| Role | Priorities |
|---|---|
| Tanks | Manage electric field spacing, soak beams, rotate positions |
| Healers | Prepare for beam/field overlap and raid-wide burst |
| DPS | Kill adds fast, manage tokens, avoid chip stuns |
| Everyone | Respect combo tracking, never duplicate tokens, spread during payouts |
💸 Want to skip the risk and win the fight on the first spin? Onlyfarms.gg helps you beat the Bandit — with mechanics coaching, full clears, and token rotation prep.
8. Mug'Zee, Heads of Security Strategy Guide (Boss 7)
Mug’Zee is a chaotic two-headed goblin boss guarding the penultimate chamber of the Liberation of Undermine raid. This encounter features mode-switching mechanics, where the raid alternates between Mug’s explosive madness and Zee’s frozen precision. In the final phase, both mechanic sets overlap, creating a brutal execution check for all roles.
Fight Overview
| Phase | Dominant Head | Theme | Danger Focus |
|---|---|---|---|
| Phase 1 | Mug | Explosives and mines | Bomb soaks, tank beams |
| Phase 2 | Zee | Ice control and positioning | Jail mechanics, golden puddles |
| Final Phase | Mug + Zee | Chaos fusion | All previous mechanics together |
Phase 1: Mug’s Explosive Havoc
⚠️ Unstable Crawler Mines
- Mines fixate players and detonate on contact.
- When they explode, they spawn 3 Cluster Bombs, each requiring a separate player to soak.
- Missed soaks = massive raid-wide explosion
🧠 Assign soak teams or mobility DPS to bait & soak. Rotate assignments each mine cycle.
💣 Cluster Bomb Soaking Strategy
- Players must spread and quickly soak all mini-zones after detonation.
- Speed is critical — the longer bombs linger, the smaller the safe zone becomes.
🔦 Intercept Beam (Tank Mechanic)
- Random player is marked for death via beam.
- Tank must step in front to intercept and mitigate damage.
- The intercepted target receives a bomb debuff and must move out of the group to detonate safely.
🔫 Gatling Spray
- Frontal cone from Mug — must be faced away from the raid at all times.
- Heavy damage and pushback if misaligned.
📍 After two Intercept Beams, prepare to transition to Zee’s side by clearing lingering mines and repositioning near center.
Phase 2: Zee’s Icy Discipline
🚪 Jail Walls + Add Fights
- Two players are selected and trapped in LoS-blocking jail walls with elite adds.
- They must defeat their adds to escape.
- Players outside can’t assist directly — responsibility is fully on jailed teammates.
🧠 Assign burst DPS to jail duty — ideally mobile ranged or strong solo classes.
❄️ Ice Spears
- Target multiple players and fire piercing ice projectiles.
- Spears must be blocked by terrain (walls, jails, leftover bombs) to prevent raid-wide hits.
🧠 Pre-plan spear lines and use leftover mechanics for interception.
💦 Golden Drip (Tank Mechanic)
- Tanks leave behind gold puddles as they move.
- These puddles restrict movement space and persist into Phase 3.
📌 Kite Zee along the edges and drop pools in unused corners.
Final Phase: Dual Mechanic Overlap
Both Mug and Zee activate simultaneously. Your raid must deal with:
| Mechanic | Priority Strategy |
|---|---|
| Mines + Cluster Bombs | Assign pre-placed soakers, rotate groups |
| Intercept Beam | Tank must intercept quickly, target moves out |
| Ice Spears | Redirect into barriers or use soakable objects |
| Gatling Spray + Jail Walls | Maintain boss orientation, clear jail adds fast |
| Golden Pools | Keep clean lanes open for movement and spears |
📣 Healers must stagger cooldowns — this phase deals constant AoE damage with burst spikes from unsoaked bombs or beam fails.
💥 Tanks rotate positioning duties and soak beams carefully while keeping movement minimal to control gold puddles.
🔥 DPS focus on execution over max uptime — mishandled mechanics are lethal here.
Mug’Zee Role Strategy Table
| Role | Key Responsibilities |
|---|---|
| Tanks | Intercept beams, rotate puddle drops, face Mug properly |
| Healers | Manage high incoming AoE + sudden jail/add pressure |
| DPS | Kill adds, handle bombs, rotate soaks, switch priorities quickly |
| Everyone | Communicate clearly in jail/beam moments, avoid overlap in soaks |
9. Chrome King Gallywix Strategy Guide (Boss 8 – Final Encounter)
The moment has arrived. Trade prince, tyrant, megalomaniac — Chrome King Gallywix steps into his custom-built chrome-plated mech, unleashing a storm of explosives, lasers, coils, and chaos. This 3-phase encounter demands coordination, environmental awareness, and quick adaptation to increasingly deadly mechanics.
Fight Overview
| Phase | Name | Focus |
|---|---|---|
| Phase 1 | House of Chrome | Bomb management, add control |
| Phase 2 | Mechanical Maniac | Coil sabotage, giga-blast synergy |
| Phase 3 | What an Arsenal! | Ultimate burn phase + layered mechanics |
Phase 1: The House of Chrome
💣 Bomb Storm Chaos:
- Gallywix launches bombs across the arena:
Red circle bombs explode in seconds → avoid standing near them.
Delayed Bad Booms explode later — reposition early.
Sapper’s Satchels attach to random players — run out before detonation.
🧨 1500-pound Dud:
- A massive bomb spawns and will explode unless manually detonated.
- Assign a “Dud Soaker” (tank or defensive DPS) to trigger it early and localize damage.
🚀 Zagging Zizzlers:
- Small unpredictable rockets zig-zag across the field.
- Constant movement required — watch for stacking fire DoTs.
Add Management
| Add | Behavior | Importance |
|---|---|---|
| Darkfuse Technicians | Drop Charged Giga Bombs on death | Use in Phase 2 |
| Sharpshot Sentries | Channel Shock Barrage (raid-wide damage) | Must be eliminated fast |
🧠 Kill Technicians near coil consoles to prep for sabotage in Phase 2.
🧷 Tank Mechanic – Scatterblast Canisters
- Frontal attack that applies a healing absorb debuff.
- Requires small group soak + tank swaps after ~5 stacks.
Phase 2: Mechanical Maniac
Now the Giga Coils activate, bathing the raid in stacking Nature DoT aura. Time is limited — sabotage or die.
⚡ Giga Coils Aura
- Each active coil increases ticking damage.
- Healers must coordinate throughput cooldowns while sabotage is underway.
🔋 Sabotage Mechanics
| Step | Action |
|---|---|
| 1 | Collect Charged Giga Bombs (from Phase 1 adds) |
| 2 | Carrier brings it to coil console |
| 3 | Gallywix casts Giga Blast to trigger Giga BOOM! |
| 4 | Console is destroyed → aura reduced |
🧠 Coordinate blast timing so Giga Blast hits the bomb. One detonation per console is enough on Normal/Heroic.
Additional Mechanics
🧯 Fused Canisters
- Land under random players, explode after countdown.
- Must be soaked by multiple players to split damage.
- Apply healing absorbs on soakers — healers stay alert.
🎯 Missed soaks lead to raid-wide damage bursts.
Phase 3: What an Arsenal!
With both coils down, Gallywix unleashes everything — all prior mechanics return, but harder and overlapping.
Signature Mechanics
| Mechanic | Description |
|---|---|
| Bigger Badder Bomb Blast | Huge bomb targets tank — leave immediately and swap |
| Tick-Tock Canisters | Must be soaked by at least one player each — else raid healing absorb applies |
| Overloaded Rocketstorm | Constant AoE rocket spam forces movement and split positioning |
| Sapper Satchels | Return from Phase 1 — keep moving, avoid group stacking |
☢️ Persistent Threats:
- Oil fires, coil remnants, dud missiles may remain from earlier phases — awareness and communication are key.
📦 Assign backup soakers, pre-plan rally points, and use immunities to save space.
Role Breakdown
| Role | Final Phase Duties |
|---|---|
| Tanks | Rapid swaps on bomb debuff, clear frontals, reposition boss |
| Healers | Rotate cooldowns, spot-heal soakers, stabilize ticking aura |
| DPS | Burn hard, soak bombs, dodge AoEs, prep for push |
| Everyone | Avoid bomb overlaps, clear zones fast, communicate constantly |
This phase is all about execution under pressure. The boss won’t last long, but neither will you — unless mechanics are handled perfectly.
Need help with coil sabotage, bomb soak rotations, or executing final push with zero deaths?
Onlyfarms.gg provides full final boss clears, mechanic coaching, and loot optimization for Chrome King Gallywix.