~9 MIN
1. Introduction
This article includes material for advanced players as well as essential concepts for those entering the arena for the first time. I have done my best to make it accessible while still offering deep insight for seasoned competitors.
🏆 My Arena Credentials
- ✅ Gladiator since Cataclysm
- ✅ Rank 1 Arena Player during Mists of Pandaria
- ✅ Competing at R1 or near-R1 level every season
- ✅ Peak arena rating: 3300+
- ✅ Played over 250,000 arenas in total
2. The Basics of Binds
It is believed that the two main conditions for success in arenas and battlegrounds are proper character control and your experience (knowledge of the game).
By control, I mean everything related to your interface: key bindings, addons, macros, and more. In this section, I’ll walk through each of these, offering my perspective from years of competitive play.
It’s pointless to argue whether clicking is viable — it simply isn’t efficient. Instead, I suggest learning from the mistakes of those who became Gladiators after making all the same missteps. “Bind All” is one of the simplest and most effective ways to boost your rating.
So, how do you actually bind properly? There’s already a lot of info online. I’m not reinventing the wheel — just gathering and highlighting the most useful parts.
⌨️ Keyboard Map
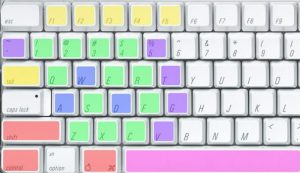
In the image above, keys are divided into colored groups. Let’s go over what each means:
🔴 Red: Modifier keys. You can’t assign actions directly to them, but they’re used to build powerful combos like Shift+E, Ctrl+R, etc. These massively expand your options.
🟢 Green: The most accessible and comfortable keys for most players. Use these for your most important, spammable abilities — think [F], not [Shift+Ctrl+V].
🟣 Space: By default, it’s jump. Don’t rebind it. But it can be used with modifiers like Shift+Space or Ctrl+Space for great utility.
🟪 Purple: Less optimal than green but still useful. Use these keys for less frequent cooldowns like T, G, 5, or ~.
🟡 Yellow: Default Blizzard client keys — Tab (enemy target), F1–F4 (party targets). Keep them or rebind if needed.
🔵 Blue: Movement keys — classic WASD. A/D should ALWAYS be set to strafe. Turn with your mouse, not the keyboard.

3. Additional Information
Other binds – You can actually use any keys that work best for you. What I’ve shown is simply one of many examples of smart key distribution. The ultimate goal: comfort and speed. If it feels right and works well — use it!
Backpedaling – Why isn’t [S] in the blue group?
If you’re still backpedaling, you’re hurting your own gameplay. Moving backwards with [S] is slow, clunky, and inefficient in PvP. Your goal should be strafing + mouse movement to reposition smoothly while maintaining full speed.
Yes, sometimes facing your opponent helps avoid frontal attacks (like rogue’s backstab), but this can and should be done through strafing, not walking backwards.
Another reason to ditch [S] as a backpedal key: it’s a great bind. Personally, I use it for
Wild Charge.
🖱️ Mouse Binds
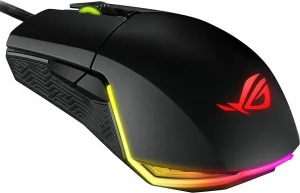
Once your keyboard layout is in place, don’t forget your mouse — it’s more than just a movement tool. Your mouse can hold some of the most valuable and responsive binds in your setup.
Mouse Wheel – It’s not just for scrolling! It’s a triple-bind opportunity:
- Scroll Down: Target Teammate #1
- Scroll Up: Target Teammate #2
- Click Wheel: Target Yourself
Side Buttons – Nearly every gaming mouse has at least two. They’re ideal for quick-reaction abilities. For example:
- Mouse Button 4: Dispel Teammate #1
- Mouse Button 5: Dispel Teammate #2
And don’t forget — all your keyboard modifiers apply to mouse buttons as well. That means binds like
Shift + MB4, Ctrl + MB5, or even Alt + Shift + MB4 are fair game.
4. My Binds
Finally, I’ll show you how I personally assign my keys. These are not recommendations, and I don’t expect you to use them. This section exists solely to demonstrate one possible result of fine-tuning your layout over time.
The point of everything we’ve covered so far is to help you build a comfortable and efficient UI — not to copy someone else’s habits blindly. Everyone’s hands, reflexes, and experience are different.
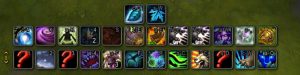
Here’s a glimpse of what my current binds look like:


5. Keybinds Table Example
Below is a reference table showcasing one possible way to distribute keybinds efficiently across your keyboard and mouse. While this setup works well for me, you should always customize your binds based on personal preference, class, and role.
| Action | Keybind | Description |
|---|---|---|
| Move Forward | W | Standard movement |
| Move Backward | S (Rebind to a skill) | Avoid backpedaling, use S for a skill |
| Strafe Left | A | Strafing for faster movement |
| Strafe Right | D | Strafing for faster movement |
| Jump | Space | Standard jump |
| Primary Attack | F | Frequently used attack ability |
| Secondary Attack | G | Less frequently used offensive cooldown |
| Defensive Cooldown | Shift + F | Assign defensive abilities to easy-to-reach keys |
| Target Teammate 1 | Scroll Down | Quick target selection with mouse |
| Target Teammate 2 | Scroll Up | Quick target selection with mouse |
| Dispel Teammate 1 | Mouse Button 4 | Fast dispel for teammates |
| Dispel Teammate 2 | Mouse Button 5 | Fast dispel for teammates |
| Self-Cast | Ctrl + Scroll Down | Self-targeting friendly spell |
| Arena Enemy 1 | F1 | Quick targeting for arena enemies |
| Arena Enemy 2 | F2 | Quick targeting for arena enemies |
| Arena Enemy 3 | F3 | Quick targeting for arena enemies |
| Mount / Utility | Ctrl + P | Less frequently used bind for utility purposes |
6. Conclusion
Mastering keybindings is a critical part of success in PvP — whether in arenas or battlegrounds. A solid keybind setup improves your reaction time, reduces mistakes, and lets you focus more on strategy instead of searching for abilities.
By experimenting with different layouts and using modifiers like Shift, Ctrl, and Alt, you can drastically improve both offensive and defensive play.
Whether you’re just starting out or already chasing Gladiator titles, remember: binds aren’t static. Keep optimizing, keep testing — and you’ll feel the results with every match.
🎯 Want more?
We offer personalized PvP coaching for each class in WoW. Our Rank 1 Gladiators with years of elite PvP experience will guide you through mechanics, positioning, and help you create your perfect keybind setup.
7. FAQ
1. What are the most important keybinding basics for WoW PvP?
Character control and interface management. Use easily accessible keys for core abilities and expand your layout with modifiers like Shift, Ctrl, and Alt.
2. Should I use default movement keys (WASD) or change them?
Keep W for forward movement, but rebind A and D for strafing. It’s faster and gives better control than keyboard turning.
3. How should I use mouse buttons for keybinding?
Use the mouse wheel for fast teammate targeting. Side buttons are ideal for dispels or utility skills, especially when combined with modifiers.
4. How can I effectively use modifiers in keybinding?
Combine Shift, Ctrl, and Alt with main keys to expand your layout. For example: Shift + E, Ctrl + R.
5. Why is backpedaling considered bad for PvP?
It slows you down and makes you predictable. Use strafing instead to reposition while maintaining speed.
6. What are good keybinds for arena targeting?
Bind teammates to Scroll Up/Scroll Down. Use F1–F3 or number keys to target arena enemies quickly.
7. How can I avoid unproductive keybinding habits?
Don’t assign abilities to hard-to-reach keys like Shift + Ctrl + V. Use the green key zone — around WASD — for fast-access skills.
8. How do I balance offensive and defensive cooldowns in my keybinds?
Use close keys like F and G for offensive skills, and Shift + Mouse Button 4 for defense.
9. What is the benefit of using a keybinding setup used by Rank 1 players?
It reduces errors, improves reflexes, and gives you proven layouts that work in high-pressure PvP. Especially helpful in 3v3 arena settings.
10. Can I still use keybinds for screenshots or companion pets?
Yes — use less accessible binds like F12 or Ctrl + P for screenshots, toys, and pets to keep prime keys free for combat use.